Thursday, May 11, 2017

MP4 to WMM: How to Import MP4 to Windows Movie Maker


How to import MP4 to Windows Movie Maker for editing? Simply convert MP4 to Windows Movie Maker supported video format to successfully edit MP4 in WMM.

You can make your movies differently by editing them on Windows Movie Maker, but not all file types will work when you try to use them. Some movies, like MP4 files which are downloaded from free sites, recorded from cameras, or iPhone, iPad, Blackberry, Android phone, are not recognizable on Movie Maker.


In fact, Windows Movie Maker supports a small amount of video formats including ASF, AVI, WMV, MPEG-1, MPEG, MPG, M1V, MP2, MPV2, WM, MPE, etc. and MP4 is not included, that's why "every time when you import MP4 to Windows Movie Maker or Windows Live Movie Maker, it stops working". If you are mired in the mess, read on to find out the solution to edit MP4 files in Windows Movie Maker in a smooth way.

Don't let that format issue stop you from showing your creativity. To make MP4 files compatible with Windows Movie Maker, you'll just convert MP4 to Windows Movie Maker supported formats like WMV or AVI. Now I share the guide with you how to convert MP4 to Windows Movie Maker friendly format using Dimo Video Converter Ultimate.

With it, you can effortlessly transcode MP4 files for smoothly importing and editing in various non-linear editing systems (NLE), including Movie Maker, Pinnacle Studio, Adobe Premiere Pro, Cyberlink PowerDirector, Avid Studio, Magix Movie Edit Pro, Sony Vegas Pro and more retaining high quality. Besides MP4, you can almost convert all video files like MKV, AVI, VOB, TiVo, MTS, MOV, MXF, etc. for editing in Windows Movie Maker smoothly. Now download it and follow the steps below to complete your task.

Free Download Dimo Video Converter Ultimate (Win/Mac):


Other Download:

Convert and Import MP4 videos into Windows Movie Maker

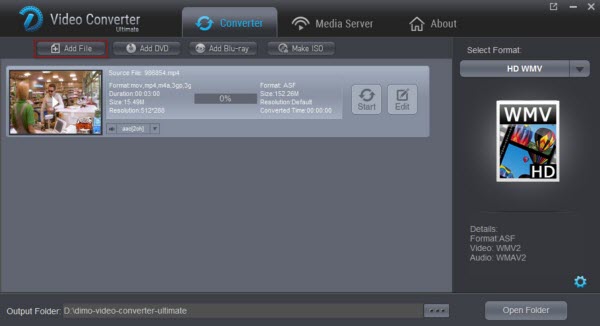
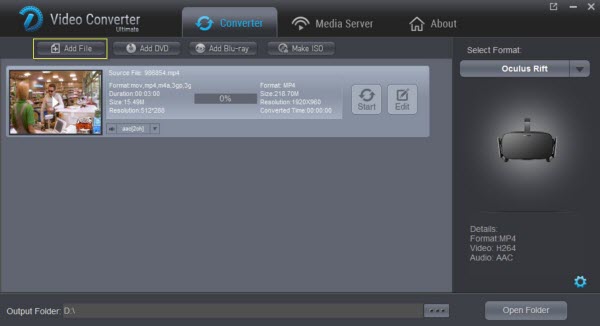
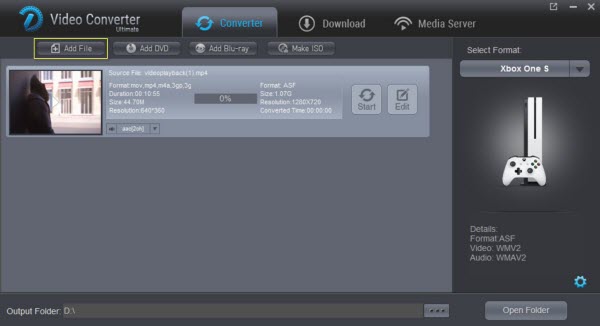
Step 1: Add MP4 files

Install and launch the MP4 video converter for Movie Maker, and then click "Add File" button to import your MP4 files to the software.


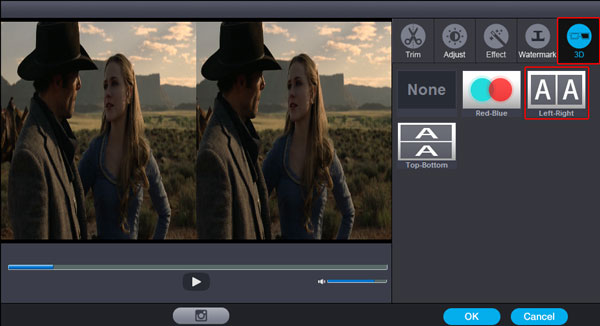
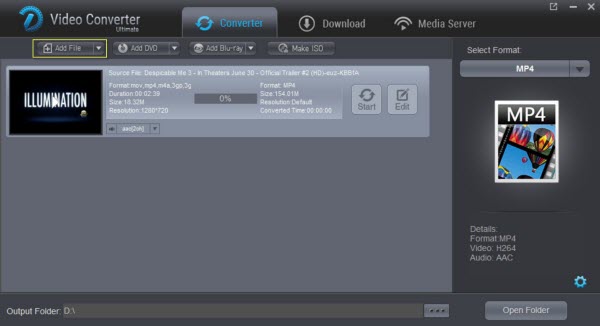
Step 2: Choose output format

Click "Select Format" bar and choose "Editor > Movie Maker" as output format on the drop-down menu of "Select Format". Of course, you can also choose AVI, WMV from "Format > Video" as the output format.

Tip: Click the Settings icon to adjust video and audio parameters on the Profile Setting as you need to get the best quality video.


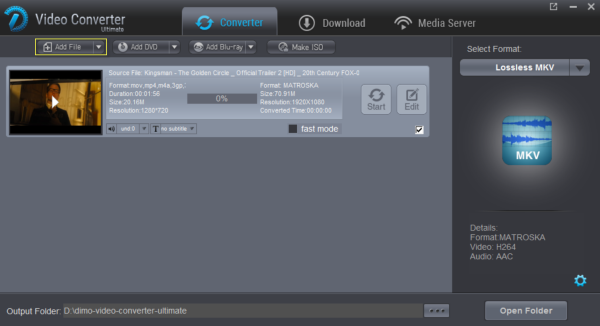
Step 3: Convert MP4 to Windows Movie Maker

Simply click the "Start" button to start converting to make MP4 video clips compatible with WMM and everything else will be automated. You're done. Now your MP4 files will be converted into WMV or AVI video files ready to be imported to Windows Movie Maker as well as Windows Live Movie Maker.

Step 4: Import MP4 to Windows Movie Maker

Depending on your version of Windows Movie Maker or Windows Live Movie Maker, the buttons are slightly different:

Import MP4 video to Windows Movie Maker: When the conversion complete, open Windows Movie Maker and click Import or Import Video on the left to import your video to the movie collection and drag and drop to the timeline for editing.

Import MP4 video to Windows Live Movie Maker: Start Windows Live Movie Maker and go to Home tab in the ribbon menu and click Add video in the Add panel to locate the converted MP4 video.

Now start working with MP4 files in Windows Movie Maker beautifully. After that, you can save the output WLMP files to AVI/MP4 or even share them onto mobile devices wirelessly.

Related Software:

BDmate (Win/Mac)

Lossless backup Blu-ray to MKV with all audio and subtitle tracks; Rip Blu-ray to multi-track MP4; ConvertBlu-ray to almost all popular video/audio formats and devices; Copy Blu-ray to ISO/M2TS; Share digitized Blu-ray wirelessly.

DVDmate (Win/Mac)

A professional DVD ripping and editing tool with strong ability to remove DVD protection, transcode DVD to any video and audio format, and edit DVD to create personal movie.

Videomate (Win/Mac)
An all-around video converter software program that enables you to convert various video and audio files to formats that are supported by most multimedia devices.
8K Player (Win/Mac)

A mixture of free HD/4K video player, music player, Blu-ray/DVD player, video recorder and gif maker.

Free Download or Purchase Dimo Video Converter Ultimate:


Need the lifetime version to work on 2-4 PCs so that your friends and family can instantly broaden their entertainment options? Please refer to the family license here.


Kindly Note:

The price of Dimo Video Converter Ultimate for Windows is divided into 1 Year Subscription, Lifetime/Family/Business License: $43.95/Year; $45.95/lifetime license; $95.95/family license(2-4 PCs); $189.95/business pack(5-8 PCs). Get your needed one at purchase page.

Contact us or leave a message at Facebook if you have any issues.

Related Articles:

Wednesday, May 10, 2017

QT MOV to MP4 Converter - Convert QuickTime MOV to MP4 seamlessly


Can't play QuickTime MOV? Converting them to MP4 is a good choice. This tutorial informs a quick and easy way to achieve seamless QT MOV to MP4 conversion.

As one of the primary formats for Apple QuickTime, the QuickTime MOV videos are commonly used by Mac users. However, MOV files are always proved to be large and uncompressed file that may take up too much room on your computer or hard drive, even it's not easy to upload to popular video websites like YouTube or share video files with someone who doesn't have a Mac, and so on.


If so, converting QuickTime MOV to MP4 can be your best choice as MP4 is more flexible than MOV files, it can be opened with almost all media players. Also, this file format is indeed more gadget friendly than its counterpart. Given this, we share ways on how to convert QuickTime movie to MP4 on Windows (10/8/7/Vista), Mac (OS Sierra/OS X El Capitan) with fastest speed and high quality, so that you can free enjoy your QuickTime MOV files anywhere and anytime.

Here Dimo Video Converter Ultimate for Windows or Mac, a versatile MOV to MP4 conversion program, is highly recommended to convert MOV videos files to MP4 and more other video formats like AVI, M4V, FLV, WMV, MPEG to enjoy the thrill of video.

Moreover, its built-in editor allows you to adjust the video effects for better visual enjoyment. Apart from that, using the free build-in media server, you could easily share all converted QuickTime MOV file to any devices with ease.

Free Download Dimo Video Converter Ultimate (Win/Mac):


Other Download:

How to convert QuickTime MOV to MP4 for Playing on Windows or Mac

Step 1 Load MOV to the best video Converter

Free download this fastest QuickTime to mp4 converter for Windows (10/8/7/Vista) on PC or the QuickTime MOV to MP4 converter for Mac version. Run it and click "Add File" to load the QT video files you want to convert.

Step 2 Choose compatible MP4 format

To convert QuickTime file to mp4 format, choose "MP4" from the popping-up windows as the output format after clicking "Select Format" > "Video". For the output QuickTime HD MP4 videos, you can also reduce the file size, customize the video settings etc.


Note:For experienced user, if you do know how to tweak the profiles, you can manually adjust the quality and compression options using "Setting" button. For novices, you can ignore these since the default settings produces a great result.

Step 3 Start MOV to MP4 conversion

After completing the setup, now, just click the "Start" button to start converting QuickTime .mov file to .mp4.

Wait for the application to convert the MOV file you imported to MP4 (H.264/MPEG-4 AVC). A little blue bar will appear showing the progress of the operation. The conversion process time may take a few minutes or more, vary depending on the size of MOV videos and quality you choose for the MP4 files.

Free Download or Purchase Dimo Video Converter Ultimate:


Need the lifetime version to work on 2-4 PCs so that your friends and family can instantly broaden their entertainment options? Please refer to the family license here.


Kindly Note:

The price of Dimo Video Converter Ultimate for Windows is divided into 1 Year Subscription, Lifetime/Family/Business License: $43.95/Year; $45.95/lifetime license; $95.95/family license(2-4 PCs); $189.95/business pack(5-8 PCs). Get your needed one at purchase page.

Contact us or leave a message at Facebook if you have any trouble to convert QuickTime MOV to MP4 file with Windows or Mac.

Related Articles:

Tuesday, May 9, 2017

Copy 3D Blu-ray to MKV for projector with MakeMKV alternative


This page will introduce you how to copy 3D Blu-ray to MKV for projector with MakeMKV. In addition, there is another solution available. Just have a look.

Have a raft of Blu-ray collections at home? Can't wait to enjoy some funny 3D Blu-ray movies on your new bought projector keeping? Then ripping Blu-ray 3D to MKV format supported by projector is surely a best choice, for preventing Blu-ray discs from physical damage, getting rid of the limitation of Blu-ray player and saving space on your shelf. In this article, I will show you how to convert and rip Blu-ray 3D to AVC/MVC MKV for playback on projector with 3D effect preserving using MakeMKV and its alternative tool.


Solution to rip Blu-ray 3D to MKV for projector with MakeMKV

As you know, multimedia players that support the AVC/MVC (the codec used by Blu-ray 3D) have recently emerged as the Sidewinder Xtreamer or Mede8er of MED1000X3D. By testing these two very powerful players on 3D playback, I could make an interesting experience before me and I thank Basthi by the way.


First of all, download and install MakeMKV to your PC. The program is free and available for Windows and Mac users. With it, you can rip Blu-ray 3D directly in AVC/MVC 3D Framepacking (Top & Bottom) 1920 x 2160 pixels + the small band of 45 pixels between the two images placed above/below as you can see on the display. this video is multiplexed 3D MKV container. Here I'll show you how to rip and store the contents of a 3D Blu-ray disc in an MKV in AVC/MVC 3D.

Rip Blu-ray 3D to lossless Full HD 3D MKV with MakeMKV

The handling is very simple, no need to soft decryption like AnyDVD HD, MakeMKV does everything alone, and automatically. Simply insert the Blu-ray 3D in your HTPC, launch MakeMKV. You then click on the icon "Blu-ray => HDD" MakeMKV and decrypt Blu-ray 3D to blast protection.


Then a small window will appear with several tracks to rip or not the Blu-ray 3D. Just select the ones you want to keep. Will be removed preferably all the trailers and clips, which are the smallest tracks (up to 5 GB), keeping only the main movie. Drop in the main movie, you can see that you can select an MVC box. By checking this box, MakeMKV will rip Blu-ray 3D MVC automatically AVC Top & Bottom (or framepacking) without loss. The video is not re-encoded and retains all the qualities offered by the Blu-ray 3D.


You can also select the audio tracks you want to keep (DTS or DTS-HD, Dolby Digital 5.1 or TrueHD) and subtitle tracks. For my part, so I keep the main movie + VF VO track or DTS-HD or TrueHD, + the forced subtitles or French. This allows for not too heavy MKV. Even with this shedding MKV, it will still be quite heavy with more than 30 GB as a reminder was still two video streams.

When you have selected the tracks of your choice, simply click on the 3D MKV MakeMKV and will be completed in about 1/2 hour to see a little more depending on the power of your PC.


Regarding the reading of this 3D MKV MVC. The Mede8er MED1000X3D and Sidewinder 3, which use the same Realtek 1186 can read it perfectly, with support for subtitles in 3D. In fact, the video is played in 2D 1080p, and if you want to see in 3D, simply opt for the 3D Top & Bottom (Top/Bottom or) format, the player will switch to sequential display 3D 1080p. and I guarantee you that this is true 1080p 3D displays, excellent quality, such as the Blu-ray 3D home. This manipulation works even read Samba, or via USB without jerking. All 3D TV I tested worked perfectly and display video in 2D or 3D 1080p user choice.

The MediaInfo analysis of 3D Full HD 3D MKV file obtained gives it below. It is therefore a good MKV to AVC/MVC profile Stereo High@4.1 with two 1080p framepacking (top & Bottom) images and an average rate of 36.7 mb./S stereoscopic broadcast that remains content (Avatar can climb to more than 60 Mb/s).


MakeMKV BETA has several major restrictions:

* Program is time-limited — it will stop functioning after 60 days. You can always download the latest version from makemkv.com that will reset the expiration date.

* HD-DVD support is limited – some discs may fail to open and not all audio and subtitle tracks will be preserved.

* Blu-ray and DVD discs are fully supported.

* Computer administrator privileges are required on Windows to run the beta version. This is limitation of Windows SCSI application programming interface. Eventually MakeMKV will not require administrator privileges to run.

* Aside from restrictions above, the program is fully functional. Produced MKV files are not degraded in any way and have no time or usage restrictions.

Alternative Solution to Rip Blu-ray 3D to MKV Full HD 3D

MakeMKV software absolutely the very first choice for rip and copy 3D Blu-ray. I downloaded the latest version and I use it for ripping a few 3D Blu-ray discs! I followed the steps seen in many tutorials over the internet, and I extracted the Mpeg4 MVC 3D Extension too (I checked that box too) along with the Mpeg4 base file. I verified the extracted "3D" file with Media Info and it says "Format profile : Stereo High@L4.1 / High@L4.1" and "MultiView_Count : 2", so…it should be a correct 3D MKV file, right!

Unfortunately for me, all I can see is just a 2D image and never can I get a 3D image, even if the file is a …3D video ripped by MakeMKV! So, I had to seek for another tool.

Above restrictions lead to the  best MakeMKV alternative below you can also use to rip, copy and convert Blu-ray to MKV Full HD 3D for projector. Here Dimo Video Converter Ultimate is one of the options. High speed and excellent conversion quality let you enjoy your favorite 3D Blu-ray movies on projector wherever and whenever you want.

It's good because you can use it as a video converter to first convert your 3D Blu-ray to any popular video format (MP4, MKV, MOV, FLV, WMV, AVI, MPEG, VOB, DV, 3GP, DivX etc) with 3D mode you choose including Left-Right(Side-by-side), Top-bottom, Red-Blue   Anaglyph  to meet your different needs. And second it not only support inputting 3D Blu-ray, but also DVD, 2D Blu-ray, MP4, MKV, VOB, FLV, Tivo, WMV, H.265, etc.  For Mac(macOS Sierra included) users, it has an equivalent version Mac Blu-ray ripping software. Download the tool and learn details.

Free Download Dimo Video Converter Ultimate (Win/Mac):


Other Download:


How to rip 3D Blu-ray to SBS 3D MKV format for projector

Step 1. Import 3D Blu-ray movie

Launch the professional 3D Blu-ray converter. Click the "Add Blu-ray" to add 3D Blu-ray movie to it. Double click the video, you can preview the movie in the built-in player.


Step 2. Choose output format

Tap on "Select Format" bar and find "Format > Video > MKV", which is commonly supported by projector. Check the projector manual to see its detailed supported format.

Tip: To keep 5.1 channel audio when ripping 3D Blu-ray, click "Settings" to go to "Profile Settings" screen and adjust "Channels" under "Audio" option. Set channels to "6" and click "OK". And then you'll get 5.1 surround sound after conversion.


Step 3. Add 3D Effect

A built-in video editor is provided to help you touch up your videos and add 3D effect before the conversion. Click the Edit button to enter the video editing window, where you can choose "3D > Left-right" to create 3D SBS video for projector, trim videos, crop videos, add watermarks, insert subtitles, apply special video effects and more to achieve a better overall effect. In this way, you can get the part and effect you want and at the same time make the output file smaller.


Step 4. Start ripping your 3D Blu-ray movies to projector

Simply click the "Start" button under the preview window, and the 3D Blu-ray ripper will start the conversion from 3D Blu-ray movies to SBS MKV. After conversion, open output file destination, locate the created SBS 3D MKV video and you could watch it on your 3D projetor as you want.

To watch movies on projector, you also need a pair of 3D Glasses:

Yes, you will need to wear glasses to watch 3D. The glasses that will be used is mostly likely be one of two types: Passive or Active.?
  • Passive Polarized glasses look and wear much like sunglasses and have enough front space to place over existing eyeglasses for those than need to.
  •    Active Shutter glasses are slightly bulky, since they have batteries and a transmitter that synchs that rapidly moving shutters for each eye with the onscreen display rate.

Depending on which brand and model TV or video projector you buy will determine which type of glasses you will be enquired for use with that TV or video projector.

Everything is done! Just have a fun of your 3D Blu-ray discs movies on Philips/Epson/Benq projectors.

Free Download or Purchase Dimo Video Converter Ultimate:

         
Contact us or leave a message at Facebook if you have any issues.

Related Articles:

Monday, May 8, 2017

Solve trouble with watching 3D movies on Oculus Rift


Run into trouble to watch 3D Videos and Movies on Oculus Rift, you can easily convert 3D into Oculus Rift compatible 3D SBS format with the tool below.

Fanciful to create 3D movies for playing on Oculus Rift? Certainly not. Maybe it has been imagined before, but in the prevailing Virtual Reality times, making 3D VR videos yourselves come true even you thought you are just an amateur. There are a few tricks required to be able to watch your own movie library on Oculus Rift, as well as convert incompatible videos for Oculus Rift in 3D. Read on.


How to create 3D MP4/MKV videos for Oculus Rift?

To watch your own 2D/3D movies and even 360 degree videos on Oculus Rift with 3D effect, you can download a free VR player app like Virtual Desktop, which allows you to enjoy your movies in correct video mode. Just browser the videos and put on your Rift to enjoy.  

Why not play good movie sources with built-in Oculus Video App?

If you have an Oculus Rift, you have probably noticed the built in Video App. The Oculus App has several limitations which include:

* Inability to detect automatically 360-degree movies stored on your computer. Workaround: Rename any 360-degree movie you have so the filename ending with  _360, then the player will pick up the file for playback in 360 degrees.

* The player will play regular video files such as .MKV in a virtual movie theater, which is cool, but it will not play 3D movies or play any sound if the audio is encoded in DD5.1, DTS or any surround sound format

You may tired of the hundreds of simple trailers, demos and some shorts from online on Rift with 3rd party VR players. In these cases, you do the favor to seek the chance to see spectacular local films in Blu-ray, DVD, AVI, MKV, MTS, MXF, YouTube FLV, YIFY, etc. within Oculus Rift, can be done?

So as to finish the task, you can adopt 3D movie creating software of Dimo Video Converter Ultimate for help. With it you can easily convert 2D/3D movies or rip Blu-ray/DVDs to MKV, MP4, AVI WMV with 3D effect to create true theater entertainment.

If you have the colorful 3D glasses and 3D player on PC like Stereoscopic Player or 3D TV, it couldn't be more wonderful to create 3D Red-Green movies for them. If you're Mac users, then turn to Dimo Video Converter Ultimate for Mac, which allows you to create 3D videos for playback on Oculus Rift on Mac(including OS Sierra and OS X El Capitan). Now download the right version and follow the tips below to finish your job.

Free Download Dimo Video Converter Ultimate (Win/Mac):


Other Download:
Steps to Make 3D movies for playing on Oculus Rift

Step 1. Add own movie library

Install and launch the best 3D Converter for Oculus Rift, and add video files by clicking "Add file" or using "Drag & drop" method


Step 2. Choose SBS 3D MP4/MKV as output format for Oculus Rift

To watch mvoies on Oculus Rift with 3D effects, you can choose an Oculus Rift customized profile with its supported format:

Go to the "Select Format" >"Device" >"VR" >"Oculus Rift"

Step 3. Set Side-by-Side(SBS) for Oculus Rift VR

Click "Edit" >"3D" >"left-right" >"OK". What's more, you can also use the useful build-in video editor in this Video Converter Ultimate to polish your video to get a better 3D visual entertainment.


Note: Although there is a profile created by the application, if you like you can always change some parameters of resolution, compression, audio, etc to get your favor output 3D movies.

An important issue that you must consider that in Oculus Rift VR resolution for each eye is not Full HD as the headset uses two separate OLED displays that receive their visual information from very powerful PCs running some of the world's best graphics cards. So you can free change your target video size, bitrate, frame rate in "Settings". Here, 720p (1280*720) with a higher bitrate around 5mbit/s is recommended. Higher resolutions for the specific format doesn't make the quality better but are a waste of power and battery life.

Step 4. Start to convert 2D/3D videos to SBS 3D MKV/MP4 for Oculus Rift

At last, simply click the "Start" button, and the 3D SBS maker will start the conversion for playback with Oculus Rift. After conversion,  head to the destination folder where the converted files are stored (under "Open" button). After that, transfer them to Oculus Rift headset for playing.

How to Watch Movies On The Oculus Rift (Development Kit 2 DK2)?

Here we go:

Step 1: Properly labeling your 360 and 3D videos
Before you can move your 360 and 3D videos to the Videos folder in your Windows system drive, it must be labeled in the proper format for Oculus to render it correctly.

Label 3D videos:

For 3D panoramic videos, top-bottom, bottom-top, left-right and right-left stereoscopic video support are implemented using the following naming convention:

Naming conventions used to label your 3D panoramic video:

"_TB.mp4" or "_360_TB.mp4" - Top / bottom 3D
"_BT.mp4" or "_360_BT.mp4" - Bottom / top 3D
"_LR.mp4" or "_360_LR.mp4" - Left / right side by side 3D
"_RL.mp4" or "_360_RL.mp4" - Right / left side by side 3D

Please add the proper naming convention to the end of your video file name.

Example: If your video file was MyCoolVideo.mp4, label it asMyCoolVideo_360_TB.mp4.

Label 360 videos:

360 videos in Oculus are implemented using spherical mapping to render panoramic videos. For your 360 video to be compatible with Oculus, add "_360" to the end of your file name. Example: If your video file was MyCoolVideo.mp4, label it as MyCoolVideo_360.mp4.

Step 2: Transfer your videos to Oculus Video

The Oculus Video app for Rift pulls video files from your default Windows video folder. To transfer your video files to the Windows Video folder:

Open your Windows System drive (this is generally your C: drive).
Open the Users folder.
Select your user profile.
Locate and open the Videos folder and move your videos here.

The next time you launch Oculus Video, your videos will automatically appear in the "My Videos" section.

How awesome is this? Yeah, it is that good! And then you can enjoy 3D movies on Oculus Rift (DK2) easily. With the innovative GUI, Dimo Video Converter Ultimate, the powerful software to create 3D movies for VR, has stepped into a whole new level of 3D performance and portability for VR videos. Wherever your ideas take you, you'll get there more than ever with adding 3D effects to own movie library, high-performance 3D Blu-ray/DVD ripping/handling based on 6X faster NVIDIA CUDA speed-up technology, state-of-the-art output VR presets like Oculus Rift,  Samsung Gear VR, HTC Vive, etc., and more.

Free Download or Purchase Dimo Video Converter Ultimate:


Need the lifetime version to work on 2-4 PCs so that your friends and family can instantly broaden their entertainment options? Please refer to the family license here.


Kindly Note:

The price of Dimo Video Converter Ultimate for Windows is divided into 1 Year Subscription, Lifetime/Family/Business License: $43.95/Year; $45.95/lifetime license; $95.95/family license(2-4 PCs); $189.95/business pack(5-8 PCs). Get your needed one at purchase page.

Related Software:

BDmate (Win/Mac)

Lossless backup Blu-ray to MKV with all audio and subtitle tracks; Rip Blu-ray to multi-track MP4; ConvertBlu-ray to almost all popular video/audio formats and devices; Copy Blu-ray to ISO/M2TS; Share digitized Blu-ray wirelessly.

DVDmate (Win/Mac)

A professional DVD ripping and editing tool with strong ability to remove DVD protection, transcode DVD to any video and audio format, and edit DVD to create personal movie.

Videomate (Win/Mac)
An all-around video converter software program that enables you to convert various video and audio files to formats that are supported by most multimedia devices.
8K Player (Win/Mac)

A mixture of free HD/4K video player, music player, Blu-ray/DVD player, video recorder and gif maker.

Contact us or leave a message at Facebook if you have any issues.

Related Articles:

Friday, May 5, 2017

How to Use Handbrake to Convert MKV Video to MP4 with Ease


Get best HandBrake alternative to convert MKV to MP4 smoothly with 7.1 audio pass-through on Windows (10) and Mac (OS Sierra).

You're probably familiar with Handbrake, which is a rarely functional program enabling people to convert MKV to MP4 free. While, some users complained Handbrake can't passthrough 7.1 TrueHD. So, ever considered looking for an alternative to Handbrake to encode MKV to MP4 with TrueHD 7.1 keeping? If so, find out in the following paragraphs.


Since Handbrake can't support 7.1 TrueHD, here is an alternative solution for you. Here we want to share a great Handbrake alternative - Dimo Video Converter Ultimate, which is able to read TureHD audio and output 7.1 TrueHD passthrough for delivering 100 percent lossless audio to the home theater.  It works as the best MKV to MP4 converter for you that enables you to easily and quickly convert MKV to MP4 videos while keeping Dolby TrueHD 7.1 audio channels. Besides, it can also convert MKV to all other popular video/audio formats, including MOV, AVI, VOB, WMV, FLV, MPG, MP3, OGG, WMA, etc without quality loss.

And it offers ready presets to convert MKV video to instantly suit for iPhone, iPad, Android, VR headsets, etc. Plus, this program employs a built-in editor, so you can use it to create special video effects as needed. You can find a range of conversion options in this app, making it convenient for users to change the quality and size of the resulting output file. If you are going to reformat MKV to MP4 with subtitles on Mac, please turn to Dimo Video Converter Ultimate for Mac.

Free Download Dimo Video Converter Ultimate (Win/Mac):


Other Download:
How to encode MKV to MP4 with TrueHD 7.1 audio retained?

Step 1. Load source MKV files

Directly drag and drop source MKV files, or click "Add File" button on the toolbar to load MKV files to the MKV to MP4 video converter for converting.


Note: This ideal MKV converter could automatically detect audio tracks from source MKV files and then list them in each video title for you to choose from. As you want to retain preferred audio track for converting result, you need to select from the detected audio channels.

Step 2. Select output format

Click "Select Format" bar and select "Lossless MKV" as the output format from "Format > MultiTrack" list. Then check "fast mode" option to activate fast conversion mode for remuxing MKV to MP4.?


Step 3. Start to convert MKV video to MP4 with 7.1 audio channels

After all necessary settings, simply press the "Start" button to start the conversion from MKV format to MP4. Within a few minutes, you can get the converted MP4 video files with keeping 7.1 TrueHD on the default output folder. Just sync or transfer them to your mobile devices for playback. Note that to playback the MKV files in Dolby TrueHD you will need a media player such as Media Player Classic Home Cinema (MPC-HC) or a Media Server such as Plex that can output the Lossless stream via HDMI to an AV Receiver that supports Dolby TrueHD.

Free Download or Purchase Dimo Video Converter Ultimate:


Need the lifetime version to work on 2-4 PCs so that your friends and family can instantly broaden their entertainment options? Please refer to the family license here.


Kindly Note:

The price of Dimo Video Converter Ultimate for Windows is divided into 1 Year Subscription, Lifetime/Family/Business License: $43.95/Year; $45.95/lifetime license; $95.95/family license(2-4 PCs); $189.95/business pack(5-8 PCs). Get your needed one at purchase page.

Contact us or leave a message at Facebook if you have any issues.

Related Articles:

Wednesday, May 3, 2017

How to Enjoy 4K Movies on Xbox One (S)

The ultimate games and 4K entertainment system let Xbox One S become one of the hottest console in the market. With its built-in media player app, you can play video and music files by USB drive or DLNA server easily. However, when play 4K on Xbox One (S), there are many users meet issues- "Xbox One (S) can not read 4K movies"... In this article, we just aim to solve the 4K to Xbox One (S) playback issue for you. 


As a matter of fact, it is officially claimed that Xbox One (S), Xbox 360 support 4K format. The point here is, only a part of 4K formats like 4K MP4, 4K MKV are supported and the supported codec are also limited. Currently, 4K content could presumably use either H.264 or H.265 for encoding, while Xbox probably won't support H.265

Moreover, even if it supports H.264, the video format problem remains: today, most of 4K movies are recorded in MXF/MTS/MOV/XAVC/XAVC-S format which the Xbox 360/One (S) does not support. Even if Xbox supports 4K MP4 , there're not many 4K MP4 video source available for you. Consequently, for native importation of 4K Movies and Videos to Xbox 360, Xbox One, Xbox One S, it is highly advisable to first convert 4K Movies and Videos with appropriate codec and format for Xbox playback. 

Actually, it's easy to get the job done as long as you get Dimo Video Converter Ultimate. This video converter has been proven to be an outstanding 4K to Xbox One (S) converter. With it, you can convert different 4K videos to Xbox One S/Xbox 360 compatible H.264 MP4 effortlessly. In addition to 4K files, this program also allows you to convert all SD/HD videos in AVI, MP4, MPG, VOB, TiVo, MOV, etc to a decent format as you want. 

What's more, with the built-in editor, you can trim, crop, add watermark, adjust special effect to your source video, so that you get the very part and effects at your will. If you are a Mac user, you can turn to Dimo Video Converter Ultimate for Mac (OS Sierra, OS X El Capitan included), which has the same function as the Windows version. Just get the right version according to your computer's OS and follow the step-by-step guide below to ensure smooth playback of 4K files on Xbox One (S) without any limits. 

Free Download Dimo Video Converter Ultimate (Win/Mac): 


Other Download:
How to convert and play 4K files on Xbox One (S) 

Step 1: Add 4K files 

Download the 4K video converter on your computer, install and run the program, add 4K videos by dragging and dropping or clicking "Add File". 


Step 2: Select Xbox One (S) compatible formats 

Click on the drop down menu of the Select Format, select "Games" > "Xbox One S", "Xbox One" or "Xbox 360" as the target device. 

Tip: If the default video/parameters can't meet your needs, just click Settings icon to adjust the video codec, bitrate, frame rate, audio sample rate, etc to get a decent video as you want. In principle, the larger input values, the better output quality, but the corresponding larger file size. (See how to compress 4K to 1080p video for Xbox.) 


Step 3: Start 4K to Xbox One (S) conversion 

After all necessary settings, you can hit the "Start" to start converting 4K to Xbox One (S) with best video settings. Once the conversion finished, click "Open" in main interface to quick locate the converted video. Then, you can stream the converted 4K movies to Xbox One (S) via DLNA or USB freely. 

Free Download or Purchase Dimo Video Converter Ultimate: 


Need the lifetime version to work on 2-4 PCs so that your friends and family can instantly broaden their entertainment options? Please refer to the family license here


Kindly Note: 

The price of Dimo Video Converter Ultimate for Windows is divided into 1 Year Subscription, Lifetime/Family/Business License: $43.95/Year; $45.95/lifetime license; $95.95/family license(2-4 PCs); $189.95/business pack(5-8 PCs). Get your needed one at purchase page


Related Software: 

BDmate (Win/Mac) 

Lossless backup Blu-ray to MKV with all audio and subtitle tracks; Rip Blu-ray to multi-track MP4; ConvertBlu-ray to almost all popular video/audio formats and devices; Copy Blu-ray to ISO/M2TS; Share digitized Blu-ray wirelessly. 

DVDmate (Win/Mac) 

A professional DVD ripping and editing tool with strong ability to remove DVD protection, transcode DVD to any video and audio format, and edit DVD to create personal movie. 

Videomate (Win/Mac) 

An all-around video converter software program that enables you to convert various video and audio files to formats that are supported by most multimedia devices. 

8K Player (Win/Mac) 

A mixture of free HD/4K video player, music player, Blu-ray/DVD player, video recorder and gif maker. 


Contact us or leave a message at Facebook if you have any issues. 

Related Articles:

Source: Stream and Play 4K videos and movies on Xbox One (S)